Water tests rely on many measurements. In the junior exercises, the single retrieve bumper must be thrown 30 feet from shore, the drop retrieve article and the take a line steward must be 50 feet from shore, and the tow a boat pull must last 50 feet "designated by markers on the shore." Swim with handler requires the dog and handler to swim twenty feet after the dog reaches swimming depth. In the senior exercises, the retrieve off a boat and the rescue occur 50 feet from shore, the take a line/tow a boat distance is 75 feet from shore, the three life-ring stewards are 75 feet from shore and 30 feet apart, and the directed retrieve articles are 50 feet from shore and 50 feet apart.
Apart from the swim with handler distance, which judges must estimate without much help, a well-run water test includes markers for all of these distances. This article will share what we've learned from our years of putting on CRNC's water test, often adapting ideas from other clubs learned while attending their tests. This article will explain our current "technology" for marking distance from shore and the various distances parallel to shore which the water rules specify.
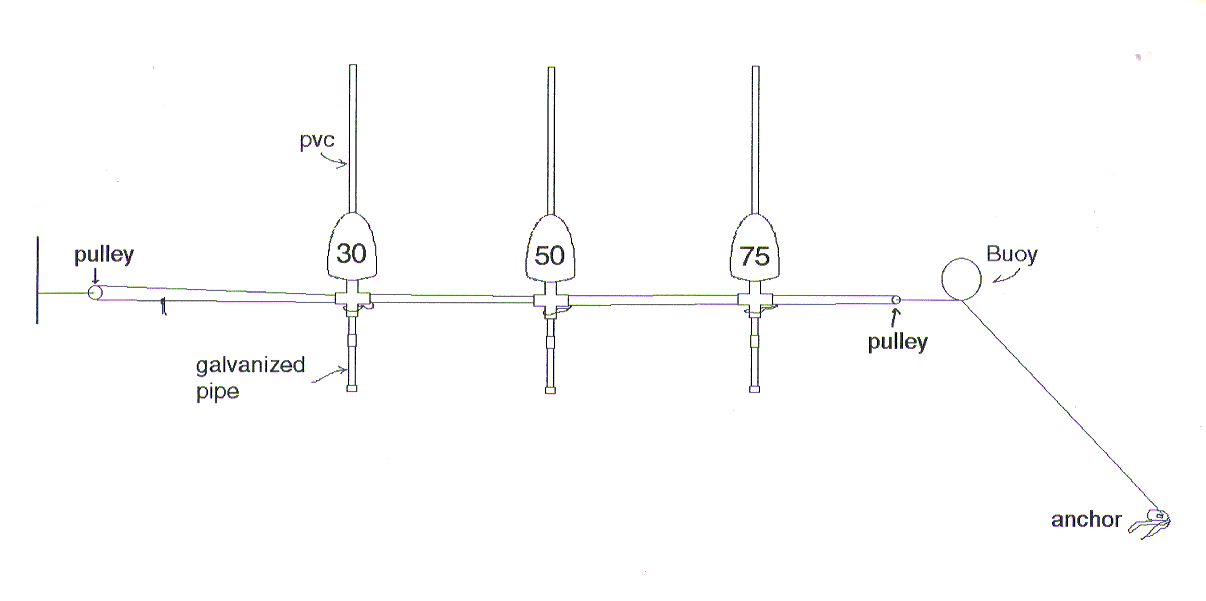
Our distance markers have worked so well for a few years that it seemed time to share them. They are ideal for sites where the shoreline changes over the course of the test, because they can be adjusted from shore by one person; because they are on pulleys, all three move as a unit. The twin lines running through the markers ride low enough in the water that boats used in the test can glide right over the lines. (I'd avoid using a boat with a really sharp edge on its keel, however). For stable sites, the pulleys can be deleted, and one line strung from shore to the end buoy, and then to the anchor; it is only necessary to get the zero marker aligned with the shoreline.
Materials (for each set of markers, double for two - except for the PVC cement):
10 feet of ľ" PVC pipe, cut into three three foot lengths and three three inch lengths
Three ľ" PVC pipe "crosses"
Three ľ" PVC to ľ" galvanized pipe adapters
Three 12" lengths (nipples) of ľ" galvanized pipe, threaded both ends
Three ľ" galvanized pipe end caps
Three 100' lengths of 3/16" braided nylon rope
One 25' length of 3/16" braided nylon rope
One medium sized plastic buoy (18" diameter seems fine)
One small boat anchor
Scraps of surveyor's tape
Colored cloth tape
I won't bother with exact measurements because I have no reason to expect that any are critical. I used ľ" PVC pipe and a PVC "cross" fitting (a four-way coupler), so I had about three feet sticking up and a few inches sticking down, cemented together, leaving the horizontal ends of the cross open. On the lower (short) piece (which is about 3"), I put a PVC-galvanized pipe adapter, and threaded in about a 12" length of galvanized pipe with a cap on the bottom. In practice, I keep a shorter pipe nipple and cap around, in case the depth at 30' is too shallow. The float is a crab float I picked up at a sporting goods store; it already has a hole through the center, and a press fit worked just fine, although PVC cement should work as well.
Running through the open ends of the crosses are two 100' lengths of 3/16" braided nylon (as opposed to merely twisted nylon) cords, spliced together at both ends, forming a 200' loop around two pulleys. For best results, the pulleys should probably be the kind where the eye of the pulley swivels, but our fixed-eye pulleys have worked just fine.
I space one loop for each float at the appropriate distance from the knot which holds a short length of surveyor's tape to mark zero. The loop should be just big enough to slip over the galvanized pipe cap and the PVC/galvanized adapter, so that it rides around the downward stem of the PVC cross. The shore end pulley is tied to a stake on shore, allowing plus or minus 12 feet adjustment in the system. It is important not to use twisted rope to secure the pulley to the stake, or tension will tend to twist the whole line, at least if you don't have a swivel eye on your pulleys.
I've marked the upper ends of the markers with a few wraps of green cloth tape to contrast with the white PVC plastic; it seems to aid visibility.
I made temporary clamps to hold both lines at the shore pulley, thinking that the markers might migrate by themselves. I don't think it's really necessary, but I use the clamp just to be sure. I just put a Ľ" carriage bolt through a couple of plywood hole saw plugs and tightened a wing nut to clamp the lines. Almost anything would work, so I didn't include this in the material list.
In storage, the loops are slipped off the bottom of the marker buoys, and the buoys are slid as a group to the shore end pulley (which is too big to fit through the cross). To erect the system, I drive the shore stake, and attach the shore pulley to that stake at a distance which I estimate to be about 12' inland of where I expect the average shoreline for the day to be. I lay out the buoys on the beach, and head for the other side of the body of water (river, lake, ocean - it doesn't matter, I shouldn't have to go more than 200 feet or so) in a rowboat, with the remainder of the line wrapped around an electrical cord reel to keep it from getting tangled. I let out the dual line until I come to the outboard pulley, and maybe 30 feet further down the anchor line (this is the third 100' 3/16" braided nylon rope); at that point, I tie a loop through the connector on the plastic end buoy, set it afloat, and keep going until I reach the end of the line. There I drop the anchor, and return to the buoy. I take up slack at the buoy from the anchor line (by pulling more line into the loop through the buoy connector) until I get the line as tight as I can.
Then I pull the boat towards the pulleys with the line, then slide the pulleys out and attach them to their appropriate loops.
At the end of the test, I pull myself out the line in a boat, unloop each marker buoy, restore the slack at the end buoy, and work myself toward directly above the anchor until it pulls free. Then I detach the anchor, and start winding the anchor line on the cord reel. When I get to the end buoy (on my way back up the line), I untie the loop which holds it to the line, and keep reeling until I reach the three marker buoys nestled against the shore-end pulley. The whole thing stores in a 5 gallon bucket, with the marker buoys sticking out the top. The anchor is in another bucket, with the end buoy acting as a cap.
Possible variations: instead of threading the line through the PVC crosses, a small loop at the appropriate location could be clipped to another loop which goes through each cross with the kind of fitting which is at the dog end of most leashes.
Marking the distance for the tow a boat in junior is simple - any easily seen objects placed 50 feet apart near the shore will do. Stewards should be able to find the correct distance from shore by looking at the distance markers to either side. But marking the separation distances for dropping multiple articles and for stewards who must be 30 feet apart requires two easily visible markers on the beach for each location. When the steward sees the two markers line up with the steward's position, the steward knows the position parallel to shore is correct. This uses the principle of parallax. More on how to use the beach markers later - here's how we set them up.
We use small (short) tracking flags of various colors (ours have fiberglass rods and bright colored nylon flags), 10 six foot lengths of ľ" black (ungalvanized) plumbing pipe, 10 five foot lengths of 1Ľ" PVC pipe capped at one end, and a 200' cloth measuring tape on an open reel. (Enclosed reel tapes quickly expire when used on wet sand). Our additional tool is a triangle of braided nylon rope (Ľ" is adequate).
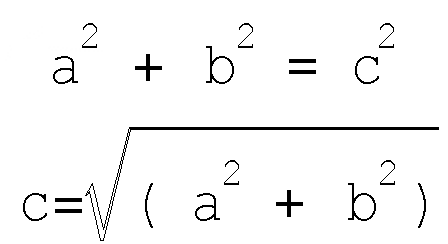
The dimensions of the triangle tool are determined by the water rules and the Pythagorean theorem, which posits that the hypotenuse (long side) of a triangle is equal to the square root of the sum of the squares of each leg. In other words,
As seen from the enclosed graphic (the irregular line represents the shoreline), one leg of the triangle is 30 feet long, with a piece of colored tape wrapped five feet from the end of the leg away from the right angle (i.e., five feet from the junction of the leg with the hypotenuse). The other leg is the distance you want the front row of the tall markers (the markers at the shoreline are short tracking flags). This will depend on the site; we have decided to move our markers closer to the shoreline next year to allow spectators to come closer to the action.
Let's say we decide to make the front row of tall markers (six foot pipes) 25 feet from the shore. Here's how we get the length of the hypotenuse:
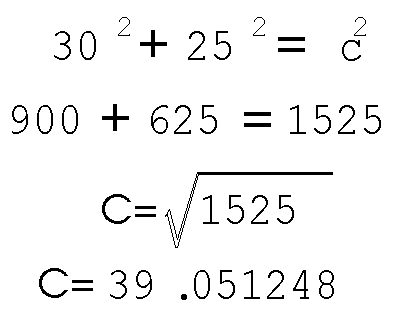
By a process of fiddling with the fraction, we learn that .051248 times 12 inches = .614976 inch, and that's about 5/8" - 395/8" is close enough for our purposes; the nylon will stretch more than an inch anyway.
Don't be intimidated by the math, just use a pocket calculator. Multiply each leg by itself (e.g., 25 X 25 = 625) to get the square of each leg, add the result to memory, recall the total of the squares of both legs, and push the square root key. Multiply the decimal fraction by 12 to get inches, and experiment with fractions (on the calculator) until you get to the nearest eighth of an inch. Okay, here's a little table that will help:
The steps are illustrated in this diagram:
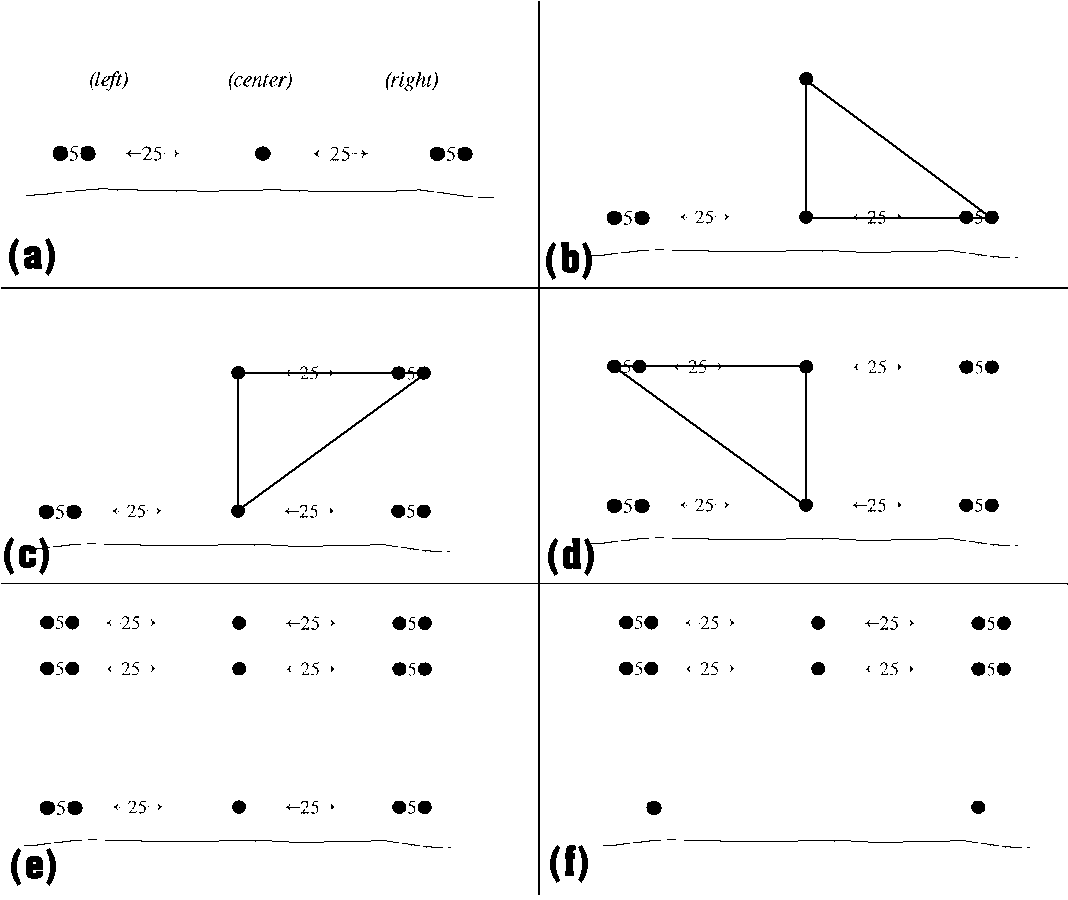
(a): Two of us hold the tape straight (taught) parallel to and near the shore, while a third person puts short tracking flags at the end of the tape, at the five foot mark, at 30 feet, 55 feet, and 60 feet. (b): We locate the center front tall marker by holding the 30 foot leg in the position indicated (the taped mark is at the inboard of the two shoreline markers, with the right angle at the center shore marker; the end of the leg is at the outboard shoreline marker). The person holding the far angle of the triangle places a flag to mark the location of the first tall marker (with all of us holding the triangle taught). (c): We flip the triangle, and hold the unmarked angle at the front center flag, and (again with the triangle held taught) the person holding the end near the tape mark places a flag to locate the outboard front row tall marker, and another at the tape to locate the inboard front tall marker. (d): We flip the triangle and place flags to mark the remaining locations for the front row of tall markers. (e): We place flags to mark the locations of the back row of tall markers by aligning them by eye with their respective front row and shoreline flags. You can easily see when the three flags are in line, and place the rear flag at that point. Ten feet between the two tall rows is plenty. The distance between the tall marker rows isn't critical, as it is the alignment of the pair of tall markers (for each distance) which guides the steward in the water.
Next, we replace the tall marker flags with the six foot lengths of ľ" pipe. We use a steel fence post pounder. Keep the pipes plumb (vertical). Then we do the same with the back row, making sure the result is two tall pipe markers still in line with the respective shoreline flag.
To aid visibility, we place a five foot PVC pipes over each tall marker. The cap on the top of each has a hole just large enough to accept a tracking flag shaft. We use different colors for each distance - e.g., red for the outer markers, yellow for the inner (25 foot) markers, and white for the center - so we can tell stewards to line up with the red, yellow, or white flags.
Finally, we remove the outer shoreline flags and (unless the judges want us to leave it) the center shoreline flag, as only the 50 foot distance needs to be marked for tow a boat in junior. After junior, we remove the remaining shoreline flags.
It is important to help inexperienced stewards to understand the use of the markers for location by parallax. Often, stewards who wear glasses normally leave them on the beach when they go out to "drown," and we end up with another steward standing behind the tall markers on the beach to guide the water steward into position with arm movements. Sometimes, a helpful volunteer, unclear on the concept, dutifully positions himself in front of the front tall marker and earnestly motions the water steward into what the volunteer believes to be the correct position. After all this work, it's a bit disconcerting to see the point so completely missed, but it still works out if the other two water stewards know where they are, since even spacing will be apparent from shore. If neither outboard steward knows the correct location from the parallax of the tall markers, we're back where we started from without shore markers, so it's important to train the crew before the actual test begins!